Tuesday, July 30, 2013

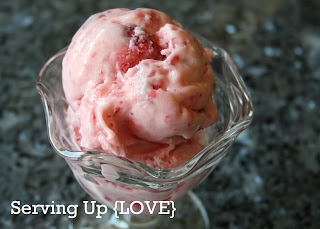
Serving Up {Ice Cream} Sour Cream Strawberry Ice Cream


Do you ever think back on something that you ate as a child and wonder if it really tastes as good as you remember it tasting?  I had that experience recently.  I was thinking about, and craving, a homemade strawberry ice cream that my mom used to make - no ice-cream freezer required.  So I contacted my mom and asked if she remembered the "strawberry ice-cream that used sour cream" and, sure enough, not only did she remember it but she still had the recipe (turns out it was my paternal grandmother's recipe).  I promptly made a batch and am now wondering how I had forgotten about this treat for so many years!  I have been missing out on some serious summertime goodness!

The recipe, as posted, is the original recipe multiplied by 3.  I can't even begin to imagine only making 1/3 of a batch.  What was my grandmother thinking?  If you prefer your ice-cream sans chunks, feel free to throw all the ingredients into the blender and pulse a couple of times.  That is what I did with a portion of the ice-cream so that I could pour it into popsicle molds for ice-cream popsicles.  The popsicles were a great variation on a very delicious, very refreshing summertime treat.


One Year Ago: White Chocolate Brownie Decadence
Two Years Ago: Cilantro Ranch Dressing

SOUR CREAM STRAWBERRY ICE CREAM      
(recipe from Linda W.)

3 10-ounce packages frozen strawberries, partially thawed 
3 cups sour cream
3 pinchs salt
2 ¼ cup sugar

Combine all of the ingredients and mix well.  
Place in a 13x9 (or similar) size pan and place in freezer.
After an hour, remove from freezer and stir ingredients again.
Return to freezer and allow to freeze solid.

Thursday, July 25, 2013

Serving Up {Pizza}: Balsamic Strawberry Pizza


I could happily eat pizza every day for the rest of my life and be happy (okay, so I know I have also said that about salad....and bread....and ice cream....but I mean it every time that I say it!).  I love unique pizza combinations and so I knew that I simply had to make this pizza when I saw it posted here (please click on this link and check out her blog - her food photography will make you drool! and her picture of this same pizza is 100 times prettier than mine).

The pizza sauce is a strawberry balsamic glaze.  I had a friend that used to serve strawberries drizzled in balsamic vinegar, so I knew that combination would work for me.  Then the pizza is tossed with chicken, bacon, sweet onions and strawberries.  It is serious deliciousness!

Serious!  Deliciousness!

Serious!


One Year Ago: Frosted Banana Cookies
Two Years Ago: Shredded Sweet Pork
                          Cilantro Lime Rice

BALSAMIC STRAWBERRY PIZZA     
(recipe from Cafe Sucre Farine)
printable version

1/2 cup strawberry jam
1/4 cup balsamic vinegar
1 tsp. Sriracha Chili Sauce
1 ball pizza dough (I like Trader Joe's)
1 cup diced chicken breast
1/2 cup applewood smoked bacon, cooked and drained and crumbled
1/2 cup thin sliced sweet onion
12 ounces shredded Italian blend cheese
1/4 cup fresh cilantro, finely chopped
1/4 cup fresh strawberries, diced small

Place pizza stone on middle rack of oven and preheat oven and stone to 450 degrees.

Place balsamic vinegar in a small saucepan. Bring to a boil, then reduce heat and simmer 4 to 5 minutes or until reduced to half of the original volume and mixture is thick and syrupy. Add strawberry preserves and chili sauce and mix well. Set aside to cool.

Prepare pizza dough by rolling it out to approximately a 14 inch circle. Place a piece of parchment paper, slightly larger than your dough on a pizza peel and sprinkle with cornmeal. Place dough on parchment paper.

Combine chicken with 2 tablespoons of the balsamic-strawberry mixture and mix to coat all chicken with sauce. Pour the rest of the sauce onto the pizza dough and spread to cover. Leave a 1 inch border all around the edge. Scatter chicken evenly over the sauce.  Place about 3/4 of the cheese on top of dough and spread to cover sauce evenly. Scatter  bacon and sweet onion over cheese to distribute evenly. Scatter remaining cheese over this layer.

Slide parchment paper with pizza on top onto pizza stone. Bake for approximately 8-10 minutes or until cheese is bubbly and crust is golden brown.

Remove pizza from oven and let cool slightly, 1-2 minutes. Sprinkle with chopped cilantro and fresh diced strawberries. Serve and enjoy!

Tuesday, July 23, 2013

Serving Up {Frozen Treat}: Cantaloupe & Cream Popsicles


It is popsicle weather around our house these days.  More accurately, it is popsicle weather around our house every day at about 4:30 when we return from our daily trip to the swimming pool.  The kids each gave into the pressure to blow $1.50 of their hard earned money on a single popsicle at the pool one time, until I pointed out to them that we could make "even better" popsicles at home that didn't cost them a thing.  They jumped on that idea!

This recipe is one that my sister-in-law passed along a number of years ago.  Truthfully, I seldom cut a cantaloupe without thinking about these popsicles.  But we are cantaloupe lovers at our house and there is never "leftover" cantaloupe with which to make these.  These have to be made with cantaloupe specifically bought for the purpose of popsicles.  I was thrilled a couple of weeks ago when the store had a sale on cantaloupe for $1/each.  I knew it was popsicle time and my kids have been loving having a freezer full of delicious cantaloupe goodness!


One Year Ago: Blackberry Syrup
Two Years Ago: Creamy Lemon Pasta
                          Egg Pie (German Pancakes)

CANTALOUPE & CREAM POPSICLES     
(recipe from Neesha W.)
printable version

1 1/2 cups cubed cantaloupe
1 cup cream (you can substitute 1/2 and 1/2)
1/2 cup sugar

Place cantaloupe in a blender and process until smooth, set aside.  In a small sauce pan, combine the cream and sugar, cook and stir over low heat until sugar is dissolved.  Remove from heat and stir in cantaloupe. Pour into popsicle molds and freeze.

Thursday, July 18, 2013

Serving Up {Salad}: Crunchy Broccoli Salad


This recipe is kind of a fusion between broccoli salad (yum!) and my favorite oriental salad recipe.  I didn't fuse the two together, but when I saw this recipe I knew that I had to try it and it did not disappoint!  In fact, after making it the first time I ended up making it again like two days later, with no leftovers either time.  I also took it with me just two weeks ago to our 4th of July neighborhood potluck and there was nothing left of it then either, so I am not the only one that has fallen hard for the flavor of this salad.

You can prepare this salad in advance, but to maintain the "crunchy" you don't want to dress the salad with the dressing until just before you plan to serve it.  I found that the amount of dressing that the recipe makes is more dressing than I have needed any of the times that I have made it.  I find that about 1/2 (maybe just a touch more) of the dressing is the right amount of dressing for my taste.  You may want to play with it for your own tastes.  The size of your "head of broccoli" would also make a difference in how much dressing you ultimately use.


One Year Ago: Frito Mess
Two Years Ago: Oriental Chicken Salad
                          Frosted Banana Bars

CRUNCHY BROCCOLI SALAD     
(recipe from Your Homebased Mom)
printable version

4 Tbs. butter, melted
1 cup pecans, chopped
2 pkgs. Ramen noodles, crushed (discard seasoning packet)
1 large head broccoli, cut into small pieces
4-6 green onions, sliced
1 lb. bacon, cooked crisp and broken into small pieces

Dressing
1 cup canola oil
1/2 cup red wine vinegar
1 cup sugar
1 1/2 Tbs. soy sauce

Mix melted butter, nuts and crushed noodles together. Spread on a cookie sheet and bake at 350 degrees until lightly brown; stirring occasionally. Set aside to cool.
Mix together chopped broccoli, onions, bacon and cooled noodle/nut mixture.
Mix together the dressing ingredients.
Toss salad with dressing right before serving.  **I find that I don't need the entire dressing.  It largely depends on the amount of broccoli but I find that 1/2 to 3/4 of the dressing is plenty for my taste**

Tuesday, July 16, 2013

Serving Up {Cake}: Lemon Sheet Cake


My husband feels very strongly that if a dessert does not contain chocolate, it is not really a dessert.  What?
As strongly as I love chocolate, there are many other delicious flavors that constitute dessert in my book. One flavor that is a close second to chocolate for me is LEMON!  Love it!  Especially in the spring and summer when the bright flavor of lemon seems to match the warmth and sunshine of the season.

I found this recipe for lemon sheet cake 15-20 years ago in a Taste of Home magazine.  I have never had to search any further - this cake is perfection.  It is moist and deliciously lemon, with a cream cheese frosting that takes it to the next level.  Yum!

I generally make this cake as written as a sheet cake, baked in a 15x10 baking pan.  But I have also baked it in a bundt pan which makes a very pretty cake to display.  If you go that route you will need to lengthen the baking time by 10 minutes or so....just keep an eye on it.  Either way, you will be in lemon heaven!


One Year Ago: Butterscotch Potato Chip Cookies
Two Years Ago: Cashew Chicken Salad
                          Raspberry Rice Pudding

LEMON SHEET CAKE     
(recipe from Taste of Home Magazine)
printable version

1 pkg. (18-ounce) lemon cake mix
4 eggs
1 can (15 oz) lemon pie filling
1 pkg. (3 oz) cream cheese, softened
½ C. butter, softened
2 C. powdered sugar
1 ½ tsp. vanilla extract

In a large mixing bowl, beat the cake mix and eggs until well blended.  Fold in pie filling.  Spread into a greased 15x10 inch baking pan.**  Bake at 350 degrees for 18-20 minutes or until a toothpick inserted near the center comes out clean.  Cool on a wire rack.

In a small mixing bowl, beat cream cheese, butter and powdered sugar until smooth.  Stir in vanilla.  Spread over cake.  Store in refrigerator.

**I have prepared this cake in a bundt pan as well.  It works great and looks beautiful, but the baking time has to be adjusted a bit longer**

Thursday, July 11, 2013

Serving Up {Entree}: Reuben Eggrolls


Last summer I admitted on this blog that I have a bit of a love affair with anything "reuben".  I shared the recipe for a Reuben Calzone, which is downright brilliant if I do say so myself.  And then, thanks to my dear friend pinterest, I saw this recipe and I thought that I had died and gone to heaven!  Reuben eggrolls!  Seriously?  It is beyond brilliant!!!  

Now, I am not generally interested in taking part in the labor intensive job of making homemeade eggrolls...all the chopping of ingredients and the rolling of the rolls and the deep frying...give me take out!  But let me tell you, I didn't even blink an eye when it came to these.  I was all over this recipe and I really didn't find it overly labor intensive.  It was a labor of love and the end product was worth the few extra minutes in the kitchen.  Let's sum up the praise with this....even my kids ask for more!


One Year Ago: Rigatoni
Two Years Ago: Coconut Banana Muffins
                          Creamy Beef Taco Meat

REUBEN EGGROLLS     
(recipe from Foodie with Family)
printable version

24 egg roll wrappers
2 pounds deli corned beef or pastrami, coarsely chopped
1 cup sauerkraut, rinsed and well drained (squeeze as much excess liquid off as you can)
2 cups shredded Swiss cheese
1 tsp. caraway seed, optional
2-3 inches canola oil in a high sided, heavy bottomed pan

In a large bowl, combine the coarsely chopped corned beef and the well drained sauerkraut.  Add the shredded Swiss cheese and caraway seed (if using).  Toss the ingredients together so that everything is evenly combined.
Place a small bowl with fresh water next to your work space (for moistening the egg roll wrapper edges) and a clean plate to place the egg rolls on once they are rolled.  Place a single egg roll wrapper in front of you, with one point facing toward you and one point facing away.  Dip your finger in the bowl of water and moisten the two edges farthest away from you.  Place 1/4 cup of the corned beef filling onto the egg roll wrapper and roll it away from you, tucking the edges as you go and sealing the edges by pressing gently.
Repeat for additional egg rolls until the filling is used up.
Heat the oil to 350 degrees.  Cook 4-5 egg rolls at a time, depending on the size of your pan.  They should cook for about 3 minutes, turning 2-3 times during that time.  Cook until they are evenly golden brown in color - do not overcook.  Remove from oil and place on a plate lined with multiple paper towels to allow oil to drain and eggrolls to cool slightly.
Serve hot with dipping sauce.

Dressing/Dipping Sauce:
1/2 cup Greek yogurt
1/2 cup mayonnaise
1/4 cup sweet pickle relish
1/4 minced sweet onion
3 Tbs. ketchup
pinch cayenne pepper
Mix all ingredients together using a fork or small whisk.  Refrigerate until ready to use.

Tuesday, July 9, 2013

Serving Up {Cookies}: Oatmeal Cranberry White Chocolate Chunk Cookies


I feel so fortunate to have stumbled across this recipe many years ago.  The recipe was on the back of the package of craisens,  Generally when I purchase ingredients, I already know what I am going to make with them so it is pretty rare for me to even glance at the recipes on the packaging.  I guess this recipe taught me a lesson.  And a pretty delicious lesson at that.

The combination of sweet white chocolate (I like to use the large chunks of white chocolate) with the tart craisen, all in a chewy oatmeal cookie base - perfection!  Go ahead and just double the recipe - I know that I always do :)


One Year Ago:
Strawberry Daiquiri Ice Cream Shake
Two Years Ago: Homemade Oreo Cookies
                          French Bread

OATMEAL CRANBERRY WHITE CHOCOLATE CHUNK COOKIES     
(recipe from Craisins package)
printable version

2/3 cup butter, softened
2/3 cup brown sugar
2 large eggs
1 ½ cup old-fashioned oats
1 ½ cup flour
1 tsp. baking soda
½ tsp. salt
1 6-ounce package craisins (dried cranberries)
2/3 cup white chocolate chunks or chips

Preheat oven to 375 degrees. Using an electric mixer, beat butter and sugar together in a medium bowl until light and fluffy. Add eggs, mixing well. Combine oats, flour, baking soda and salt in a separate bowl. Add to butter mixture in several additions, mixing well after each addition. Stir in dried cranberries and white chocolate. Drop by teaspoonfuls onto ungreased cookie sheets.

Bake at 375 degrees for 10-12 minutes or until golden brown.

Thursday, July 4, 2013

Serving Up {Salad}: Gorgonzola Waldorf Salad


I could probably eat salads every single day of my life and not tire of them.  In fact, I could probably eat salads every day of my life and never repeat a salad - I just feel like there are that many variations out there.  And salads really are a perfect summer food.  Served alone or alongside some grilled chicken, you have the makings of a gorgeous meal!

I stumbled across this recipe, using blue cheese, and knew that I wanted to make it but I prefer the milder gorgonzola over it's blue cheese cousin.  The recipe, as written, is just a suggestion.  Add more apples or less celery or change out the nuts - but whatever you do, make the dressing!  I loved it.  Thick and creamy and delicious.  In fact, I loved it so much that I used the leftover dressing as a vegetable dip and would highly recommend trying it.  Delicious!


One Year Ago: Thai Barbecued Salmon Filet
Two Years Ago: Welsh Cakes
                            Philly Steak

GORGONZOLA WALDORF SALAD     
(recipe adapted from Beyond the Peel)
printable version

Salad:
2 apples, I prefer a tart variety (granny smith)
2 celery stalks, optional
4 cups mixed salad greens
1/2 cup roasted pecans
fresh ground pepper, as desired

Dressing:
1/2 cup crumbled Gorgonzola
1/2 cup sour cream
2 Tbs. lemon juice
2-4 Tbs. water
Place all the ingredients together and blend until well combined and desired consistency.

Tuesday, July 2, 2013

Serving Up {Appetizer}: Mexican Seven Layer Dip


Well, hello!

It's been a while.  Six whole months to be exact.  What started as an unintended lapse in posts over the busy Christmas holiday became a deliberate time off as I had to consider my purpose in posting to this blog and what I wanted to accomplish.  What it finally came down to is that I post recipes for fun and for my family.  Period.  I want to stay true to that purpose and needed the break from posting to spend time in my larger role as mom and wife.  It's kind of the idea of good...better...best.  The blog is a good thing but I have a lot of better's and best's in my life that needed to be attended to and the break helped me to re prioritize some of the other areas that demand my time.

Six months ago I was preparing some hearty soup recipes to share and other spring holiday favorites, but those recipes will just have to wait cause right now IT'S SUMMER!

This recipe seemed like the perfect recipe to post since summer has just started here in the NW.  A week ago I was sending my children out with jackets still on but this week we are cranking the a/c and looking for ways to cool off.  And with the 4th of July only two days away, this recipe celebrates all the holiday BBQ gatherings that I enjoyed as a child because this dip was at every one of them - it wouldn't have been a family gathering without it!

Aside from being a great appetizer, I have served this on more than one occasion as the entree.  I figure all the food groups are represented - why not?  You could even prepare it with a layer of taco meat if you really felt that it couldn't be served as a main dish without the beef :)  Another variation that I have enjoyed is replacing the refried bean layer with this black bean recipe.  Totally awesome variation!

One Year Ago: BBQ Potato, Bacon & Corn Salad
Two Years Ago: Homemade Root Beer Float Ice Cream

MEXICAN SEVEN LAYER DIP     
(recipe from aunt Mary)
printable version

2 cups of your favorite refried beans
1 cup sour cream
1/4 cup mayonnaise
1/2 pkg. taco seasoning
3 ripe avocados
3 drops Tabasco
2 Tbs. lemon juice
1-2 bunches green onions, chopped
2 medium tomatoes, chopped
small can slices olives
2 cups Monterrey jack & cheddar cheese

Combine sour cream, mayonnaise and taco seasoning and set aside to chill.
Meanwhile peel, pit and mash the avocados.  Add the Tabasco and lemon juice and set aside to chill.
To assemble, choose a large platter and spread the beans to cover the entire platter - you only want the beans to be about 1 inch thick.  Then spread the avocados over the beans, leaving the beans exposed along the edge.  Then spread the sour cream mixture over the avocado layer.  Sprinkle evenly with chopped green onions, chopped tomatoes, olives and end with the cheeses.
Serve with tortilla chips.