Thursday, November 29, 2012

Serving Up {Gifts}: Holiday Neighbor Goodies

Goodness, this year has flown by.  How is it that we have reached December already?  I feel like I just mailed off my taxes and now it is time to mail off Christmas cards.  I think that as kids we ought to have been warned about the adult time warp that takes over your life as you age - you know the one....where the days and weeks and months no longer drag on with endless questions of "what can I do?".  Instead the days (and weeks and months) come so quickly that it is difficult to recall where we are in the calendar and I can't remember the last time I have said, "I'm bored".  

I was recently sorting photos and came across two that I wanted to post as ideas for holiday gifts.  I love to get creative and treats are a fun way to get creative in gift giving.  These are fun starting points but the options to make them your own are infinite - so, go ahead, get creative, but report back to me your great ideas!

Hot Cocoa Kit     
This was a gift we made for some friends and family just last Christmas.  I have made/distributed homemade cocoa mix in the past but this go-around I opted for using Stephen's Hot Chocolate (if it can't be homemade, it has to be Stephen's!).  The kit included: 
* miniature marshmallows 
* candy cane stirrers that had been dipped in white chocolate 
 * large marshmallows that had been dipped in dark chocolate and rolled in crushed peppermint
* plastic spoons dipped in chocolate and sprinkled with crushed peppermint 

The kits were so fun to assemble that my own kids wanted their own hot cocoa bar to try all the cocoa accompaniments.  A tradition was born and we have a hot cocoa bar already on the calendar two weeks out.


S'more Kit     

S'mores are a favorite of mine and this was a fun gift that we gave to neighbors three years ago.  I opted for the basic s'more recipe, but with all the s'more variations out there you could get pretty creative.  I know we have enjoyed a summer S'more Smorgasbord in the past and have created some pretty good s'more variations that could be capitalized on for the holiday.

What goodie gifts are you giving out this year?

Tuesday, November 27, 2012

Serving Up {Appetizer}: Pomegranate Salsa


Have you ever eaten anything and just been floored...like, where has this been my entire life and why have I never heard of it/seen it/eaten it?  Right?  There is just so much out there that is sheer deliciousness!  This salsa definitely falls into that category.  Between the avocado and pomegranate, I could eat this as a meal.  Oh wait, I have :)

So outside of the life changing event that this salsa will be...I need to teach you the right way to de-seed your pomegranate which could also be life changing.  There are a lot of methods out there claiming to be the "easiest" but I will tell you right now there is only one way to do it.  Leave it to good old Martha to figure it out - please click here and watch the tutorial.  Once you know the secret, you will begin buying pomegranates like bananas and enjoying them all winter long like I have started to do.  Love it!  Love pomegranates!  Love this salsa!  Love you!


One Year Ago:  Peanut Butter Fritos

POMEGRANATE SALSA     
(recipe from Georgia G.)
printable version

1 small pomegranate (if the pomegranate is bigger, double the avocado and tomato)
1 tomato, chopped
2 Tbs. onion, finely chopped
1 avocado, chopped
1/2 tsp. coriander
1/2 tsp. Accent (optional)
1/8 tsp. cayenne pepper
1/2 tsp. salt

Remove the seeds from the pomegranate and place in a medium bowl.  Add chopped tomato, chopped onion, coriander, accent, cayenne pepper and salt.  Stir gently until all are combined.  Add avocado last* and gently fold into the other ingredients.  Chill until ready to serve.  Serve with Frito Scoops.

* if you make the salsa in advance, then omit the avocado until you are ready to actually serve it so that it does not brown

Thursday, November 22, 2012

Serving Up {Drink}: Hot Russian Punch (Hootch)


Posting a beverage photo is tricky, especially when it isn't something that can be topped with whipped cream and chocolate shavings with drips running over the sides.... obviously I am over thinking my photos but really, what can you do with a liquid?  The only answer I have is that you can talk it up enough that anyone reading will believe you when you say, "THIS IS MY FAVORITE HOLIDAY BEVERAGE OF ALL TIME!!!"  Did you see the three exclamation marks?

This recipe is an old family recipe, although I don't know the true origins of it.  Grandma Wright's recipe card reads "Hot Russian Punch" but in our family we affectionately refer to it as "Hootch" and have as long as I can remember - unless you are my four year old who calls it "Pootch" and can't seem to get over his cute error.  Growing up we would always make gallons and gallons of this (not exaggerating  because it was what we gave to our neighbors at Christmastime as a gift.  It quickly became something that many of our friends not only looked forward to receiving but they had their own family traditions surrounding it.

This hot punch IS Christmas in my book.  From the time I make it, and it fills my kitchen with the delicious scent of cinnamon and cloves, until I am cuddled under a blanket with a steaming cup warming my hands as well as my insides.  Christmas just wouldn't be Christmas without Hootch making it's appearance.  Even if the appearance in the above photo appears somewhat benign...

One Year Ago: Decadent Triple Layer Mud Pie

HOT RUSSIAN PUNCH (HOOTCH)     
(recipe from grandma Wright)
printable version    

4 quarts water
4 sticks cinnamon
30 whole cloves
1 cup lemon juice
6-ounce frozen orange juice concentrate
46-ounce can pineapple juice
4 cups sugar

Place water, cinnamon sticks and whole cloves in a large stock pot and bring to a boil.  Allow to boil for 10 minutes.  Strain spices.***
Add the lemon juice, orange juice concentrate, pineapple juice and sugar.  Allow to remain on the heat until punch has returned to a near boil and the sugar is completely dissolved.
Cool before placing in containers.  Store in the refrigerator.  Warm before serving.

***I follow my mom's lead and don't strain the spices.  I like them to remain in the container after I make the punch, which allows the flavors to intensify (if it lasts that long).  I just strain the spices as I serve it.

Tuesday, November 20, 2012

Serving Up {Vegetable} Roasted Sweet Potatoes & Leeks with fresh Sage


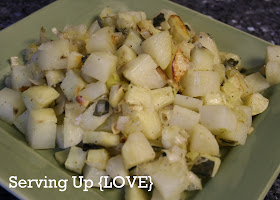
I have been on a leek kick as of late and although I totally realize that my last post was a potato and leak recipe, I am posting another right behind it because it is a great recipe.  Not to mention it's cold outside where I am and there is something very hearty and comforting about roasted root vegetables at this time of year.

Roasting vegetables is my absolute favorite way to prepare just about any vegetable.  I have posted roasted pumpkin and roasted asparagus and roasted broccoli and roasted new potatoes, but I also roast squash, kale, mushrooms, peppers....even carrots!  The flavor is the absolute best and my kids like their vegetables so much better prepared that way.  This recipe was something that I threw together because I had a (white) sweet potato, a yukon gold potato and a leek that all needed to be used and I just knew they needed to be roasted together.  Boy oh boy, did I got it right!  We had dinner guests over the first time I prepared this dish and there wasn't a bite of these potatoes remaining by the end of the meal.  Yum!


One Year Ago: Thanksgiving Beans

ROASTED SWEET POTATOES & LEEKS WITH FRESH SAGE     
printable version

1 large sweet potato (white variety)
1 large russet or yukon gold potato (could omit or use another sweet potato in place of)
1-2 large leeks
olive oil
1/2 cup (packed) fresh sage
salt and pepper

Preheat oven to 425 degrees.  Line a large baking pan with foil and spray with non-stick spray.

Peel both potatoes and cut into 1-inch cubes.  Place in a large bowl.  Wash leeks well and chop.  Add the leaks to the bowl of potatoes.  Drizzle olive oil over all and toss until everything has a light coating.  Slice fresh sage into strips and add to potatoes.  Season all generously with salt and pepper.

Spread potatoes evenly onto prepared pan so that all potatoes are in a single layer.  Bake at 425 degrees for 30 minutes or until potatoes are tender when poked with the tines of a fork.  You can stir or toss the potatoes halfway through the baking time, but it isn't necessary.  Be sure to test a sweet potatoes as they do not cook as quickly as the russet or yukon gold (if using the potato combination).

Thursday, November 15, 2012

Serving Up {Vegetable}: Mashed Potatoes and Leeks


One year ago, in preparation for Thanksgiving, I posted my all-time favorite mashed potato recipe and I would not have guessed that a year later I would even consider posting another recipe.  But I have made these potatoes twice in just the past two weeks and they are really delicious and deserve to be published!

I was at the tire repair shop recently and the television had a cooking segment on it (I wish I could give correct credit, but it was not a network I was familiar with) preparing "easy" Thanksgiving sides.  These potatoes were prepared and, although I don't have the official recipe, I was able to remember the important steps and re-create it at home.  The key is the combination of the leeks with the potatoes - a BRILLIANT combination considering the number of Potato Leek Soup recipes out there.  It is just a natural, and delicious, flavor combination!

So if you are looking for a great way to add something new to your Thanksgiving table next week, I would highly suggest tweaking your potatoes just slightly.  You won't be sorry!


One Year Ago: Refrigerated Mashed Potatoes

MASHED POTATOES & LEEKS     
printable version

3-4 pounds potatoes, russet & gold combination
1/2 cup butter
2 leeks, washed thoroughly and chopped
1 1/2 cup heavy cream
salt & pepper to taste

Peel potatoes and cut into 1-inch cubes.  Place into large pan.  Cover with water and add (generously) salt.  Place on stove and bring to a boil, cooking until tender.

Meanwhile, place butter in a medium saucepan and melt over medium heat.  Add the chopped/washed leeks and allow to cook until the leeks are tender and fragrant.  Add cream to the saucepan and heat without bringing to a boil.  Remove from the heat and place in a blender, or use an immersion blender to process just until the leeks are blended with cream.

When potatoes are tender, remove from heat and drain cooking water.  Begin mashing the potatoes by adding about 2/3 of the cream to the potatoes.  Add additional cream as needed.  You want creamy potatoes but don't want so much cream to create a soup.  Add salt and pepper to taste.

Tuesday, November 13, 2012

Serving Up {Thanksgiving}: Menu Line-up


How did we get to the second week of November, with Thanksgiving only one week away?

I guess it is time to make the shopping list!

Just this morning I was on the phone with my mom who was asking for my Thanksgiving Beans recipe.  It made me think that I ought to put all my Thanksgiving recipes in one place (or one post to be more accurate).

This is what Thanksgiving looks like most years at our house....enjoy!


Thursday, November 8, 2012

Serving Up {Sandwich}: Roasted Pepper Wraps


This post is dedicated to all of my friends and family who will be warmly welcoming Trader Joe's to Salt Lake City later this month.  I have lived near a Trader Joe's ever since I have been married and have often joked with my family that I could never move back to Utah because there wasn't a Trader Joe's there.  I am glad to finally have that piece rectified.  In my celebratory mood, I made this wrap entirely with things I purchase from Trader Joe's (although you could technically make this wrap without using anything from Trader Joe's).

Last month my husband served in an advisory role for a community event that provided free information to people regarding finances and financial planning.  The event had food catered and I think he mentioned the food multiple times as we talked briefly during the day.  At the end of the day, he ended up bringing home a couple of roasted pepper wraps that had been served and they were SO good!  So I promptly unrolled one and took note of what was in it so that I could recreate the goodness.  The ingredients are really simple, but when combined it makes a very flavorful, satisfying wrap.  It's hard to believe that something so healthy can be so easy to put together.


And in keeping with my Trader Joe's love-fest, I would highly recommend serving this wrap with these...
chips as a side and these...
cookies as dessert.

Welcome to Utah Trader Joe's!!!


One Year Ago: Holiday Yams & Apples

ROASTED PEPPER WRAP     
printable version

Red, Yellow, Orange Bell Pepper
4 Organic Wheat Wraps (could use a high quality tortilla)
Cream Cheese, softened
Garlic Hummus Dip
Baby Spinach

Begin by roasting your bell peppers.  Cut each pepper into quarters and remove all seeds.  Place skin side up on a foil-lined pan.  Place in the oven and set broil to high.  Watch VERY carefully - you want the skins to turn black, but you don't want the pepper to burn.  Once the skins are all charred and beginning to blister, remove from the oven and immediately place the peppers into a bowl and cover the bowl securely with plastic wrap to capture the heat.  Allow the peppers to steam for about 20 minutes, at which point you can remove the charred skins from the peppers and the peppers are ready to use.

To create wrap, generously spread your wheat wrap (or tortilla) with cream cheese.  Next spread a thin layer of garlic hummus over the cream cheese.  Layer baby spinach leaves over the hummus.  Cut roasted bell peppers into strips and lay the strips down the center of your wrap.  Roll your wrap tightly and enjoy!

Tuesday, November 6, 2012

Serving Up {Breakfast}: Egg Nog Syrup

Last week I made a quick Target run the day after Halloween, not intentionally on that day, it just happened. My four-year old commented immediately about the fact that Christmas had arrived at Target.  It sure had!  Never mind that 12 hours earlier we were celebrating Halloween!  The costumes and candy and trick-or-treating may as well have been months ago.  Christmas had come to Target, as well as most other retailers I am sure.

Although I do have a bit "hum bug" attitude about the hyper-marketing that surrounds Christmas, I have to admit that I did make a bee line for the refrigerator section.  I figured if Christmas decor was out, then so should be the Christmas food.  And sure enough....there was a full case of Egg Nog!

Last year I tweaked my homemade syrup recipe by substituting buttermilk for egg nog and the result was divine!  Since you can only purchase egg nog for the next couple of months, do yourself a favor and make some of this syrup for those that you love.  They will thank you.  They may also drink the syrup, but that is just another form of their love being expressed :)


One Year Ago:  Pumpkin Chiffon Pie

EGG NOG SYRUP     
(recipe adapted from Grandpa Holbrook)

1/2 cup butter
1 cup sugar
3/4 cup egg nog
1 tsp. vanilla
1 tsp. baking soda

In a large saucepan, combine butter, sugar and egg nog and heat until a light boil is reached, ensuring the butter has melted and the sugar has completely dissolved.  
Remove from the heat and add the vanilla and baking soda and stir until well combined. 
Serve over waffles, pancakes or french toast.

Thursday, November 1, 2012

Serving Up {Pasta}: Parmesan Orzo with Basil


Isn't Orzo a great little pasta?  I don't know what it is about it, but I think it is so fun and I find myself drawn to any recipe that has it in it.  And man am I ever glad that my fascination with Orzo caused me to stumble upon this recipe.  The basil and Parmesan flavors are subtle enough to make this a terrific side dish, yet flavorful enough that you could easily use this recipe as a base for a main dish - by tossing it with roasted vegetables or sausage or both!

I would normally mention that this recipe makes a large amount if used as a side dish - except for the fact that we have never had any left over when I have made it, despite it's large quantity.  So I guess that speaks to it's deliciousness, as well as maybe also to our tendency to eat a bit more than necessary when it's just darned good!


One Year Ago: Pumpkin Doughnut Muffins

PARMESAN BASIL ORZO     
(recipe from Tasty Kitchen)
printable version

3 Tbs. butter
1 1/2 cup orzo
3 cups chicken broth
6 Tbs. freshly chopped basil
1 cup Parmesan cheese
1/2 tsp. salt
1/2 tsp. pepper

Melt the butter over medium heat in a large stockpot.  Add the orzo and saute until the orzo begins to turn golden brown.  Slowly add the broth and bring to a boil.  Cover and simmer for 20 minutes or until all of the broth has been absorbed.  Remove from the heat and add the basil, Parmesan and salt and pepper to taste.